This year didn't start off very well for us unfortunately. We were plagued with illness and, therefore, general miserable-ness. As any of you mothers out there know, nursing a sick child while sick yourself is not fun.
The good news (for me, that is) is that when I finally recovered, I felt like a phoenix rising out of the ashes. I have a renewed sense of purpose and energy and overall, feel in much better spirits than I'd had in the whole of 2009. I really think the fish oil supplement I'd recently started on is responsible for this about-face (literally) in my outlook.
So now, on to the good stuff :)
We spent a lovely week in Singapore over Christmas and Nikhita stayed up, for the first time, late enough to open presents after all the guests and merry-makers had left for the night.
In keeping with the tradition I'm trying to establish and maintain, I made clothes for all three of us to wear on Christmas Day. This year was not as hurried as last year but I still cut it too close yet again. For a change, Nikhita's was a skirt and blouse ensemble. Mine remained a dress (so much easier to wear and no head-scratching-what-to-match-with-this-top frustrations), and the husband got a shirt as usual (no photos unfortunately but it's just a short-sleeved shirt la).


The plaid skirt is made out of a shirting fabric which was wonderful to work with. The crispness of the fabric went well with the box-pleating, but because I am the particular sort, those pleats have been stitch-pleated into eternal submission nevertheless.


There is a back yoke but no front yoke because I originally planned to smock the upper half of the front. But the wide box-pleats would not have looked nice smocked on such a little skirt so I decided to use (finally!) these lovely asymmetrical micro buttons that have been in my stash forever to 'hold' the pleats together at the upper half.

The top is a very simple peasant-style blouse. It is cut in one piece and sewn together at the side seams. The pattern is naturally the result of a lack of time but worked out surprisingly well.


The tangerine dress was designed to reflect a sense of the vintage. It is made entirely out of cotton for practical reasons - hot Singapore weather (thanks for the print fabric, L!). I am also very pleased that both pieces of fabric came from my stash and nothing was new bought :)....(the fabric for Nikhita's outfit were both new but 1 metre of each hardly counts, yes?)
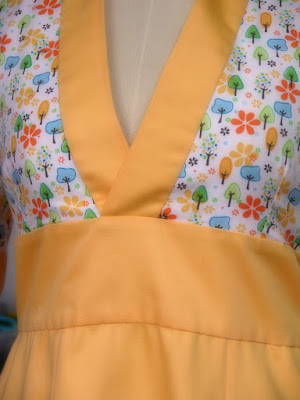

There are concealed pockets in the skirt (not shown - completely forgot to take pictures) and the dress is fully lined - a mistake actually, considering I wanted it light-weight and cool. I might take it out, I think.
Patterns for both the dress and child's skirt are on the drawing board and will be available for sale soon. Meanwhile, I give you a short tutorial to draft the peasant blouse and make it up.

All measurements in centimetres. (click for bigger)
Instructions:
1. Fold the fabric into half lengthwise, and then half again cross-wise.
2. Place your pattern on the fabric such that the centre front and the shoulder line are on the folded edges of the fabric.
3. Trace and pin the layers together, especially at the neck opening. You can add additional seam allowances before cutting it out but there is no real need with this loose fit.
4. Cut the pattern.
5. While the layers are still folded, cut out the neck opening.
6. Remove the pins and unfold the layers. You will get 1 continuous piece.
7. With RS together, fold along the shoulder line into 2. Pin together.
8. With a small seam allowance of 0.25" or 5mm, sew together the underarm seam and side seam. Serge the raw edges of the sewn seams together. Press SA to one side.
9. To make the elastic casings at sleeve 'cuff' and at bottom of the blouse, fold under, twice, the raw edge at the sleeve opening and bottom of the blouse. Make the folds about 1cm or 3/8" wide. Press down.
10. Sew down the fold, leaving an opening of at least 1 inch or 3cm. I found it easier to hand sew the fold down with small running stitches.
11. Cut pieces of narrow elastic to size (wrist measurement + 4.5cm, waist measurement + 6cm).
12. Thread elastic into the casings and overlap the ends together by 1cm. Secure the elastic into a loop with hand-sewn whip-stitches along the edges.
13. Close the openings left in point 10. above.
14. To make the casing along the neckline, either make your own bias tape from the blouse fabric or use ready-made bias tape:
a. With RS of the bias tape facing RS of the bodice, pin the bias tape, edge to edge, to the neckline opening. Leave an overlap (bias tape) of at least 2cm at each end.
b. Sew the tape to the neckline edge. When you reach the end, fold the first 2cm overlap over on itself, and then sew the ending overlap over this.

c. Press the formed seam at the neckline towards the tape.
d. Turn the bias tape over to the WS of the bodice.
e. Turn the pre-fold at the bottom edge of the bias under and sew bottom edge of the tape down to the bodice. You can hand sew with running stitches for greater control. When you reach the curved edges near the shoulders, you might have to ease the extra fabric of the bodice onto the bias tape.
f. Leave an opening of at least an inch for insertion of the elastic.
15. Cut another piece of elastic to size (shoulder width minus 5cm, x 2).
16. Insert the elastic into the casing and secure as before. Close the opening.
17. Give the blouse an all-over press and you are done!
This tutorial is by no means perfect. Let me know your thoughts and any difficulties you face and I will edit as necessary :)
EDITS
- image on drafting the peasant blouse has been updated to show where measurements should be halved.
Am shocked that I actually gave you print fabric. Eh? I can't believe it. But I recognize it, so it must be true. Your dress is perfect. Perfect! All the lines meet! Nothing sags or pulls! When I grow up I want to sew dresses like you.
ReplyDeleteP.S. As said in email, I am so going to copy the little plaid skirt. BUT I think mine will look vile because the plaid fabric I have is too soft. The pleats will never stay. Grr.
Hi Jen,
ReplyDeleteFound your blog via pinterest and loved this tutorial. Your dress is so pretty.
I have to try this top pattern, this looks so easy to draft and sew. I will let you know how it went once I finish it.Thanks for sharing your pattern drafting tips.
thank you for this tutorial. I have to make a pirate style dress for my teenager to wear under the corset I made for it. (never making one of those again) and this is perfect for the look she wants. Thank you a thousand times after the complexity of the corset this was perfect.
ReplyDeleteThank you so much for this blouse pattern and tutorial! I have been looking for ages for a simple peasant blouse for a dance costume and this is the first I have found that doesn't require complicated calculations and separate sleeves. Exactly what I was looking for!!
ReplyDeleteI found decent information in your article. I am impressed with how nicely you described this subject, It is a gainful article for us. Thanks for share it. Buy Wholesale Baby Girl Clothes
ReplyDeleteGreat rread thank you
ReplyDelete