The fifth installment in the drafting series is all about drafting the basic sleeve block. And it is written by me(!) as a guest blogger for the series. I've reproduced the post below (with kind permission) for you my very own readers :)
There are many seemingly different methods to draft a basic sleeve block. Although the practical aspects (steps, procedures) may differ, the objectives of each step is constant, no matter the how. But admittedly, some methods are easier to follow than others. Old school tailors and dressmakers would take only 2 or 3 measurement points and rely on instinct to draw out the sleeve cap and armscye, free-handing the curves about as often as they use French curves. The cutters on Savile Row all do it that way still, and I read somewhere that straight/square rulers are off limits to the apprentice cutter because nowhere on the human body is to be found a right angle! But of course, it takes years to go from apprentice to pro on The Row. We, (un)fortunately, only have a post or 2.
So here goes... This method is adapted from vintagesewing.info (wonderful free resource) but re-processed in more straightforward language and I've modified one or 2 things which I've found make very little difference one way or the other. I chose it because it has proved a good method with very satisfactory results. It will draft a straight, long sleeve. From this, you can shorten it to 3-quarter, half, or any length you want. The procedure will seem lengthy at first, but don't be put off by this. And there is a neat summary at the end for easy reference.
Required measurements:

Drafting:
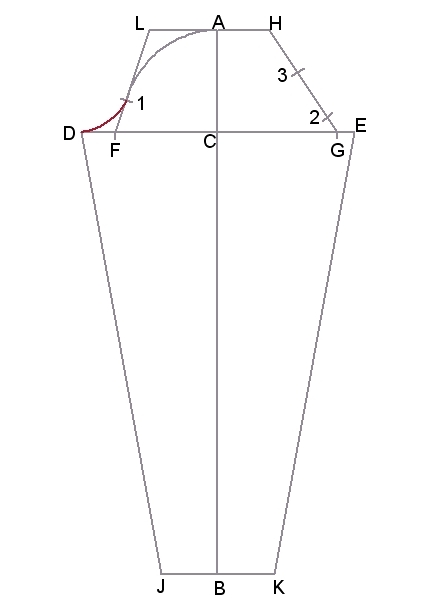
Step1 - take a piece of paper, sufficiently large, and fold it in half, lengthwise.
Step 2 - measure and mark out the overarm length on the fold of the paper. Label the top mark A and the bottom mark B.
Step 3 - from point B, measure towards point A, the underarm length and mark this C on the fold.
Step 4 - add 1" ease to the bicep circ. measurement and divide the answer by 2. [ (Bicep+1) / 2 ]
Step 5 - from point C, draw, towards the left, a horizontal line equal to the no. derived in Step 4. Mark the end point D.
Step 6 - add 0.5" ease to the wrist circ. measurement and divide the answer by 2. [ (Wrist+0.5) / 2 ]
Step 7 - from point B, draw, towards the left, a horizontal line equal to the no. derived in Step 6. Mark the end point J.
Step 8 - open up the paper (unfold it). From point C, draw, towards the right, another horizontal line equal to the no. derived in Step 4. Mark the end point E. The bicep line is now complete.
Step 9 - from point B, draw, towards the right, another horizontal line equal to the no. derived in Step 6. Mark the end point K. The wrist line is now complete.
Step 10 - draw a line from point A to point B to mark out the overarm length marked out earlier. This line will also function as the grainline.
Step 11 - connect points D and J, E and K.
Step 12 - divide line DC into 4 equal segments. Mark the first point F. [ DF = 1/4 DC ]
Step 13 - divide line CE into 8 equal segments. Mark the last point G. [ GE = 1/8 CE ]
Step 14 - add the lengths of DF and GE. From point A, draw, towards the right, a horizontal line equal to DF+GE. Mark the end point H. [ AH = DF + GE ]
Step 15 - multiply the length of DF by 2. From point A, draw, towards the left, a horizontal line equal to 2DF. Mark the end point L. [ AL = 2DF ]
Step 16 - connect the points F and L.
Step 17 - mark a point, 1, on line FL, equal to the length DF. [ F1 = DF ]
Step 18 - connect the points G and H.
Step 19 - from G, mark a point, 2, on line GH, equal to the length of GE. [ G2 = GE ]
Step 20 - from H, mark a point, 3, on line GH, equal to the length of AH. [ H3 = AH ]
Step 21 - using a French Curve, draw a smooth curve from point A to 1, then 1 to D. On the other side, A to 3, then 2 to E.


Summary of Steps 2 - 21:
Step 22 - mark the left half of the pattern 'Front', the right half 'Back'. The front has a curvier sleeve cap, the back sleeve cap is less curved.
Step 23 - measure the front cap from point D to point A, and then the back cap from point A to E. Compare to the front and back armscye on the bodice. The front sleeve cap must ideally be up to 0.5" (max.) bigger than the front armscye. Same for the back cap and armscye. You can increase or decrease the sleeve cap measurement as shown below. The total length of the sleeve cap should be anywhere between 0.5" to 1" (max.) bigger than the total armscye measurement of the main bodice block (sloper). Edit- Sleeve caps ideally should NOT HAVE ANY EASE. Yes, that's right. What's essential is the SHAPE of the cap, the way I've drafted it below. The curve of front cap should be a lot more pronounced than in the back cap. Keep adjusting until the length of the front cap equals the length of the front armscye on the bodice, and the back cap equals the back scye of the bodice.
 Measure
 Red lines = increase
Blue lines = decrease
An important point to note:
The drafting of the armscye curves on the sleeve is rather arbitrary. There really are no hard and fast rules/formulae to developing the one with the best fit. The previous steps simply aid you towards drawing a front scye that will accommodate the forward-jutting ball joint the shoulder, and a slopier one for the back. You must constantly measure and remeasure both the scyes on the bodice and the sleeve to ensure the ease differences as explained in Step 23.
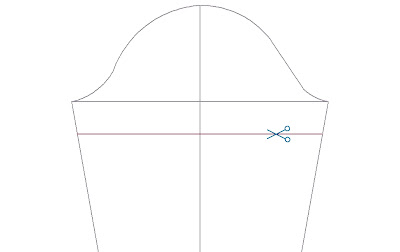
Finally, you'll want to adapt the long sleeve block for a short sleeve. This is very easy to do. First, measure down from the centre of the bicep line the length of the short sleeve desired. In the example below, this length is 1.5".

There are many seemingly different methods to draft a basic sleeve block. Although the practical aspects (steps, procedures) may differ, the objectives of each step is constant, no matter the how. But admittedly, some methods are easier to follow than others. Old school tailors and dressmakers would take only 2 or 3 measurement points and rely on instinct to draw out the sleeve cap and armscye, free-handing the curves about as often as they use French curves. The cutters on Savile Row all do it that way still, and I read somewhere that straight/square rulers are off limits to the apprentice cutter because nowhere on the human body is to be found a right angle! But of course, it takes years to go from apprentice to pro on The Row. We, (un)fortunately, only have a post or 2.
So here goes... This method is adapted from vintagesewing.info (wonderful free resource) but re-processed in more straightforward language and I've modified one or 2 things which I've found make very little difference one way or the other. I chose it because it has proved a good method with very satisfactory results. It will draft a straight, long sleeve. From this, you can shorten it to 3-quarter, half, or any length you want. The procedure will seem lengthy at first, but don't be put off by this. And there is a neat summary at the end for easy reference.
Required measurements:
- Bicep circumference (typically around the arm adjacent to the armpit, but if the widest circ. is elsewhere on the upper arm, take that measurement instead)
- Overarm length (from shoulder point to wrist, arm slightly bent)
- Underarm length (from arm pit to wrist)
- Wrist circ.

Drafting:
Step1 - take a piece of paper, sufficiently large, and fold it in half, lengthwise.
 |
| Step 1 |
Step 2 - measure and mark out the overarm length on the fold of the paper. Label the top mark A and the bottom mark B.
 |
| Step 2 |
Step 3 - from point B, measure towards point A, the underarm length and mark this C on the fold.
 |
| Step 3 |
Step 4 - add 1" ease to the bicep circ. measurement and divide the answer by 2. [ (Bicep+1) / 2 ]
Step 5 - from point C, draw, towards the left, a horizontal line equal to the no. derived in Step 4. Mark the end point D.
 |
| Step 5 |
Step 6 - add 0.5" ease to the wrist circ. measurement and divide the answer by 2. [ (Wrist+0.5) / 2 ]
Step 7 - from point B, draw, towards the left, a horizontal line equal to the no. derived in Step 6. Mark the end point J.
 |
| Step 7 |
Step 8 - open up the paper (unfold it). From point C, draw, towards the right, another horizontal line equal to the no. derived in Step 4. Mark the end point E. The bicep line is now complete.
Step 9 - from point B, draw, towards the right, another horizontal line equal to the no. derived in Step 6. Mark the end point K. The wrist line is now complete.
 |
| Steps 8 & 9 |
Step 10 - draw a line from point A to point B to mark out the overarm length marked out earlier. This line will also function as the grainline.
 |
| Step 10 |
 |
| Summary so far |
Step 11 - connect points D and J, E and K.
 |
| Step 11 |
Step 12 - divide line DC into 4 equal segments. Mark the first point F. [ DF = 1/4 DC ]
 |
| Step 12 |
Step 13 - divide line CE into 8 equal segments. Mark the last point G. [ GE = 1/8 CE ]
 |
| Step 13 |
Step 14 - add the lengths of DF and GE. From point A, draw, towards the right, a horizontal line equal to DF+GE. Mark the end point H. [ AH = DF + GE ]
 |
| Step 14 |
Step 15 - multiply the length of DF by 2. From point A, draw, towards the left, a horizontal line equal to 2DF. Mark the end point L. [ AL = 2DF ]
 |
| Step 15 |
Step 16 - connect the points F and L.
 |
| Step 16 |
Step 17 - mark a point, 1, on line FL, equal to the length DF. [ F1 = DF ]
 |
| Step 17 |
Step 18 - connect the points G and H.
 |
| Step 18 |
Step 19 - from G, mark a point, 2, on line GH, equal to the length of GE. [ G2 = GE ]
 |
| Step 19 |
Step 20 - from H, mark a point, 3, on line GH, equal to the length of AH. [ H3 = AH ]
 |
| Step 20 |
Step 21 - using a French Curve, draw a smooth curve from point A to 1, then 1 to D. On the other side, A to 3, then 2 to E.


Step 21
Summary of Steps 2 - 21:
- AB = overarm length
- BC = underarm length
- DE = bicep + ease
- Point C = mid point of DE
- JK = wrist + ease
- DF = 1/4 DC
- GE = 1/8 CE
- AH = DF + GE
- AL = 2DF
- F1 = DF
- G2 = GE
- H3 = AH
Step 22 - mark the left half of the pattern 'Front', the right half 'Back'. The front has a curvier sleeve cap, the back sleeve cap is less curved.
 |
| Step 22 |
Step 23 - measure the front cap from point D to point A, and then the back cap from point A to E. Compare to the front and back armscye on the bodice. The front sleeve cap must ideally be up to 0.5" (max.) bigger than the front armscye. Same for the back cap and armscye. You can increase or decrease the sleeve cap measurement as shown below. The total length of the sleeve cap should be anywhere between 0.5" to 1" (max.) bigger than the total armscye measurement of the main bodice block (sloper). Edit- Sleeve caps ideally should NOT HAVE ANY EASE. Yes, that's right. What's essential is the SHAPE of the cap, the way I've drafted it below. The curve of front cap should be a lot more pronounced than in the back cap. Keep adjusting until the length of the front cap equals the length of the front armscye on the bodice, and the back cap equals the back scye of the bodice.
 Measure
 Red lines = increase
Blue lines = decrease
An important point to note:
The drafting of the armscye curves on the sleeve is rather arbitrary. There really are no hard and fast rules/formulae to developing the one with the best fit. The previous steps simply aid you towards drawing a front scye that will accommodate the forward-jutting ball joint the shoulder, and a slopier one for the back. You must constantly measure and remeasure both the scyes on the bodice and the sleeve to ensure the ease differences as explained in Step 23.
Finally, you'll want to adapt the long sleeve block for a short sleeve. This is very easy to do. First, measure down from the centre of the bicep line the length of the short sleeve desired. In the example below, this length is 1.5".

Shortened to 1.5" below bicep line
You can also choose to measure from the top of the sleeve cap down along the centre line to a point where you'd like the sleeve to end.

And that's basically how you draft a basic sleeve block. Just like a body sloper, you can adapt this block to create different types of sleeves, a few of which I will show you how to in another post. Coming up next - solving fitting issues with sleeves.You can also choose to measure from the top of the sleeve cap down along the centre line to a point where you'd like the sleeve to end.

Then draw a line, perpendicular to the centre line (or parallel to the bicep line), across the width of the sleeve.

 A short sleeve!

Cut away the pattern below this line and you have your shortened sleeve.

Cut along the new hemline
 A short sleeve!
Simple, right?
Bravo! I must come and comment here, because I knew this was going up here. Felt funny commenting on own blog. I must testify that this is a lovely, simple method that works. And I don't say this for just any formulaic drafting thingummy. Most of them leave me wondering, "But what's the rationale?" I like the symmetry on all these curves - DF = F1, EG = G2 etc. Thank you again for doing this!
ReplyDeleteHi,
ReplyDeleteLooking at the vintage sewing website, it seems the difference between that cap and yours is the omission of the number 2 point placed on the front side of the cap. You skip that point to create a more asymmetric cap.
I've been learning to sew and I've been wondering about the relationship of the cap shape to the armscye. When I first started drafting a sleeve pattern, I was under the impression that the sleeve cap had to be identical in shape to the armscye. So it's hard to say what shape truly suits your fit? It's understandable that the front is different from the back, but can one say "this cap is the exact shape suitable for my arm" ? That's the big question that's left me stumped.
Thanks,
Cristian
Hi Cristian - yes, I omitted the 2nd point on the front sleeve cap. This is because in the many drafts I've made for various measurements, that number 2 point often presents itself perilously close to the number 1 point, which led me to question its utility. In instances where it is a good enough distance above the number 1 point, the front sleeve cap gains a very large increase in the ease measurement. For these 2 reasons, I often draft without plotting that 2nd point, without any mishap :)
ReplyDeleteI definitely agree and commiserate with you on the difficulties involved in getting a sleeve cap that fits you just right. Like I said in my post, the shape of the curves in the cap are utterly arbitrary. One really does have to test drive things a bit before falling upon the best draft. The method I've described in the post are by no means the best, but I chose it here because it is the most straightforward I've found so far that works well too, but one size does not fit all, after all. Do experiment and search out other methods that work just as well or better yet.
Jen,
ReplyDeleteThanks for your reply. I'm a little hesitant to draft a sleeve with such indentation because the top of the cap seems to end up too narrow. Perhaps I need to draw the back portion of the cap with less curvature first and then I can consider indenting the front side of the cap. Your method, another I've found online, and one from a book I just ordered all seem to result in a sleeve cap that is too narrow at the top, and I'm assuming this is true because once sewn, the shoulder is not round enough. I did however trace a sleeve cap from a shirt that fits reasonably well and has a softer curve for the front and back cap, although the cap height is identical, and that extra roundness at the top of the cap must be the result of a better fit around the shoulder.
-Cristian
Thank you for this post. I just cannot seem to get the sleeves right. So I will now try out with your instructions. Thanks.
ReplyDeleteHi, thank you so much for your tutorial.
ReplyDeleteIS there a way to draft a sleeve with 0-ease at the cap so that it can be sewn flat with the bodice, without "easing" it in?
Thanks, again.
Hi Linda,
DeleteEase is actually not necessary at all in fitting the sleeve cap to the armscye. The key is in the shape of the sleeve cap. I've edited this post to amend the previous information. Please see the relevant part in red italics. Thanx!
Thank you for this tutorial.I am much pleased with it.
ReplyDeleteThis comment has been removed by a blog administrator.
ReplyDeleteThank you. I will try to make my own sleeve. Thank you again for this tutorial.
ReplyDeleteThank you so much for this awesome tutorial! All the other sites I searched so far used a standard measurement for the cap height which was a problem for me because I'm trying to make a jacket for a two year old. Thanks again, I will try this right away!
ReplyDeleteThank you so much, your instructions are clear and concise, you have been a great help.
ReplyDeleteThanks so much for this. Can I have the cutting instructions for the bodice part of the dress?
ReplyDeleteHi Tinkerbell. You can find it here: http://www.ikatbag.com/2010/08/drafting-part-ii-front-sloper.html
Deleteand here: http://www.ikatbag.com/2010/08/drafting-part-iii-back-sloper.html
One of the very few online texts that describe the sleeve sloper so simply. Congratulations
ReplyDeleteThank you this is very detailed and helpful.
ReplyDeleteHi ...this is the simplest n detailed sleeve pattern making description I have ever found on internet....thanks for ur gr8 effort...I will try it soon...
ReplyDeletethank you it came out perfect
ReplyDeletevery useful guidelines.. Simple and detailed.. Thanks.. LAW 421 Final Exam
ReplyDeletehi im wondering what if you dont have underarm sleeve length measurement? and only have the sleeve length and armhole circumference? how to determine the cap height?
ReplyDeleteThanks for guidelines..it was easily understood and detailed. I was able to customized my sleeves.
ReplyDeleteQuestion. Do you cut the fabric exactly to the sleeve pattern drafted above, or do you have to still add in your seam allowance?
ReplyDeleteYes, you have to add seam allowance.
DeleteI did this and my sleeve came out perfect. Thank you
ReplyDeleteUnulcifrigtsuAtlanta Chase Hicks https://wakelet.com/wake/PUcowrC4jjBiGNZtC0VXo
ReplyDeleterirelingcrem
Your blog has very good knowledge and gave huge instructions, which were commendable ideas. Thank you so much for sharing the article. This is very useful for me. For more detail you can visit Autocad Drafting Services.
ReplyDeleteMsamiZcont_a Matthew Casillas UnHackMe
ReplyDeleteFonePaw
Microsoft Office
zusgaumateam
That is a very informative blog about drafting. There are Cad Drafting Services to learn and explore.
ReplyDeleteYou are sharing a particularly decent article here. It is a significant and factual article for us. It’s an extraordinary and informational blog with such good thinking. Also visit for more bill of materials. I hope to have many more entries or so from you. Thanks for sharing this content; this blog is very informative and useful stuff keep posting articles like this.
ReplyDeleteThank you very much for sharing the knowledge. I found this blog very informative. The CAD drawing services provide a comprehensive 2D or 3D representation of an architectural or construction project's features. Hence, approach these CAD services for better accuracy and quality.
ReplyDeleteStep into effortless style with the Wild Fable Leather Jacket , exclusively at Arsenal Jackets. Featuring a sleek silhouette and edgy finish, it's the perfect layer for any bold look. Shop now to add this fashion-forward piece to your collection.
ReplyDeleteYour blog always brightens my day. Keep it light and insightful! Excavation Services in Edmonton
ReplyDeleteGreat content and very easy to read. I like how the article explains everything step by step. While browsing related topics earlier today, I also came across a useful click speed practice tool online.Practicing with tools like this can help improve clicking speed gradually.
ReplyDeleteReally informative post. Drafting a basic sleeve block is such a fundamental skill in garment making, and understanding the structure makes a huge difference in fit and comfort. Detailed guides like this are valuable for anyone interested in fashion design, much like how brands such as J4 Jackets focus on well-crafted pieces and attention to detail.
ReplyDelete