Here's my second installment on drafting a sleeve block. The original post is here as part of the ongoing series on drafting featured on Ikat Bag.
When I trace out my sleeve block onto fabric, I like to include the centre and bicep lines, as points of reference when I check for fit. A good fit on the sleeves should locate these 2 lines where you'd like them to lie, following the line of the upper arm (centre line) and parallel to the bicep (bicep line).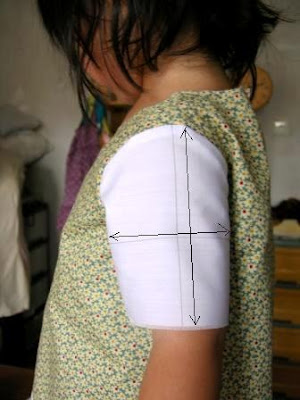
If the reason is no. 1:
reduce the width of the sleeve below the armpit by pinching out the excess fabric. Like so:
If the reason is no. 2:
just redraft the sleeve block with a reduction of 0.25" (at a time) on either side of the bicep line. Measure again the lengths of each armscye to ensure that there is some ease (up to 0.5") on each scye. (see Steps 22 and 23 in previous post).
When I trace out my sleeve block onto fabric, I like to include the centre and bicep lines, as points of reference when I check for fit. A good fit on the sleeves should locate these 2 lines where you'd like them to lie, following the line of the upper arm (centre line) and parallel to the bicep (bicep line).

Good alignment
 Rubbish - but see where the centre line should lie
If the centre line does not follow the line of the upper arm, this could be due to either of the following reasons (usually!): 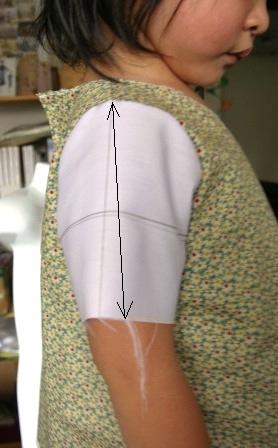 Rubbish - but see where the centre line should lie
- too much width in the draft of the sleeve below the bicep line, resulting in too much fabric below the armpit and a flappy sleeve.
- too much ease in the bicep measurement, causing the sleeve be - er - flappy and listless.
If the reason is no. 1:
reduce the width of the sleeve below the armpit by pinching out the excess fabric. Like so:

Pinch out only about 0.25" at a time. Do this with the arm raised to ensure you do not pinch out too much causing the sleeve to be too tight across the upper arm when the arm is raised. Check to see if the centre line has been adequately realigned. If it is still misaligned, then assume that the reason is no. 2.
If it is aligned, then measure the amount you have pinched/pinned out at the sleeve opening (only on one side). Redraw the sleeve block, reducing the total width of the opening by the same measurement (say 0.5") on BOTH sides.

If it is aligned, then measure the amount you have pinched/pinned out at the sleeve opening (only on one side). Redraw the sleeve block, reducing the total width of the opening by the same measurement (say 0.5") on BOTH sides.
just redraft the sleeve block with a reduction of 0.25" (at a time) on either side of the bicep line. Measure again the lengths of each armscye to ensure that there is some ease (up to 0.5") on each scye. (see Steps 22 and 23 in previous post).

Sew up the new sleeve block and attach to the bodice. Check the centre alignment. If it is still off a little, then reduce the ease again by another 0.25" (1/4") on both ends, as above, and try again.
If you are not sure if it is no. 1 or 2:
try no. 1 first because it is a simpler fix compared to 2. That is not to say that you can always do no. 1 as an easy way out of the problem!
Disclaimer:
The 2 reasons described above aren't the only ones to fix a misaligned centre line. But I've found that they are the commonest when fitting a child's sleeve because small children's arms are much less defined with muscle/bulk.
The Importance of Sufficient Ease
There are 2 areas of the sleeve where ease is necessary - at the bicep and on the sleeve cap.
Let's discuss the bicep ease first. Remember that there really should be a bicep ease of at least 0.5" total. Otherwise, you will find the sleeve very tight across the bicep when the arm is raised.
If however, you've drafted the armscye on the sleeve block lower than the depth of scye by 1" (that is, an ease of 1" in the depth of scye), then you really should draft the bicep on the sleeve with a 1" ease total.

If you lower the depth of scye even more (let's say 2"), then add ease to the bicep by the same amount.

Sometimes it won't look and feel too tight when the arms are hanging down by the side. But when the arm is raised, the problem is much more obvious, and very uncomfortable. The fabric pulls at the armpit and wrinkles form at there.

If you are not sure if it is no. 1 or 2:
try no. 1 first because it is a simpler fix compared to 2. That is not to say that you can always do no. 1 as an easy way out of the problem!
Disclaimer:
The 2 reasons described above aren't the only ones to fix a misaligned centre line. But I've found that they are the commonest when fitting a child's sleeve because small children's arms are much less defined with muscle/bulk.
The Importance of Sufficient Ease
There are 2 areas of the sleeve where ease is necessary - at the bicep and on the sleeve cap.
Let's discuss the bicep ease first. Remember that there really should be a bicep ease of at least 0.5" total. Otherwise, you will find the sleeve very tight across the bicep when the arm is raised.
If however, you've drafted the armscye on the sleeve block lower than the depth of scye by 1" (that is, an ease of 1" in the depth of scye), then you really should draft the bicep on the sleeve with a 1" ease total.

If you lower the depth of scye even more (let's say 2"), then add ease to the bicep by the same amount.

After this, redraw the seam on the upper arm to curve in until a point somewhere in the middle of the upper arm.


Sometimes it won't look and feel too tight when the arms are hanging down by the side. But when the arm is raised, the problem is much more obvious, and very uncomfortable. The fabric pulls at the armpit and wrinkles form at there.

looks sort of okay when arms are down...
 ...but look what happens when arms are raised.
 ...but look what happens when arms are raised.
To reduce and eliminate the wrinkles, redraft the sleeve, adding more ease to the bicep (0.25" at a time) on either side, as described above. To prevent yourself always redrafting as you work out the sufficient amount of ease to add on, make sure you cut a big seam allowance (about 1" width) for the entire sleeve. Then it's only a matter of removing the sleeve and redoing the underarm seam to accommodate the additional ease to the bicep.
 blue lines = new underarm seamline (sewing line)
 blue lines = new underarm seamline (sewing line)
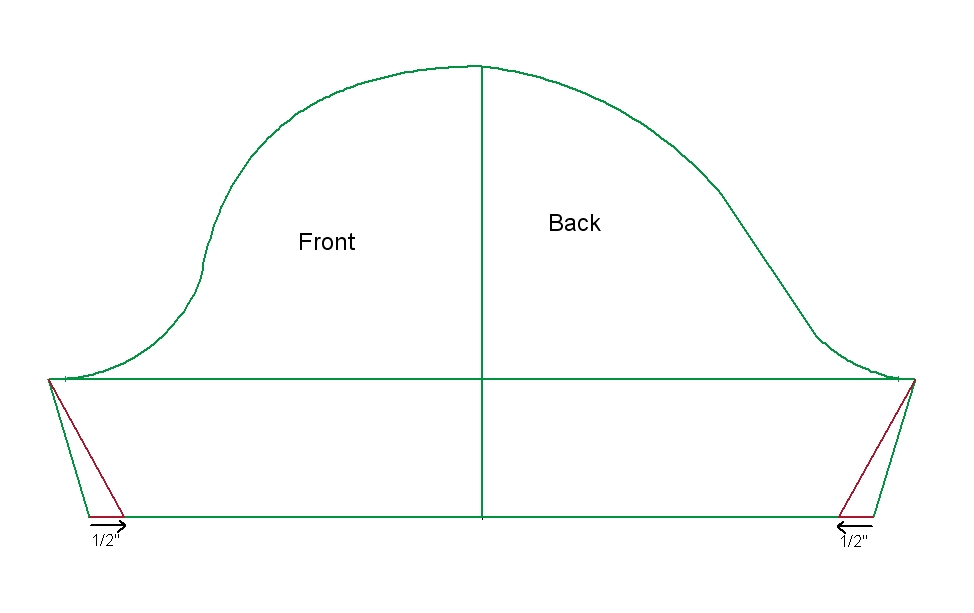
Now let's move on to the sleeve cap ease. Ease at the cap allow the fabric to lie smoothly and comfortable over the rounded part of the arm which makes up the shoulder/arm ball and socket joint. On adults, sometimes accommodation must be made for the presence of muscle development there as well, so more than normal ease should be added. On children, however, you have a relatively simple task of just adding enough ease to fit nicely over the ball joint. As mentioned in the earlier post, for a standard set-in sleeve, the amount of ease should really be no more than 1" maximum, divided (unequally is ok) between the front and back sleeve cap.
If there is insufficient ease, the fabric at the cap will strain over the ball joint (black arrows), causing the sleeve to ride up the arm and create wrinkles running upwards from the underarm seam (blue arrows).

If there is insufficient ease, the fabric at the cap will strain over the ball joint (black arrows), causing the sleeve to ride up the arm and create wrinkles running upwards from the underarm seam (blue arrows).

In the picture above, the problem occurs only at the back cap. A mirror result will develop if there is insufficient ease in the front cap. To create a smoother fit over the ball joint and reduce or eliminate the wrinkles, redraw the sleeve cap for more ease where the problem mainly is ,front or back (red lines).


In the process of working out the best amount of ease, there might very well be a lot of doing and undoing, forwarding and backwarding. This is normal. But please don't be deterred. Just keep at it and the satisfaction you get when it turns out just right is quite worth it...because it will fit well and wear comfortably!
Coming up next - how to adapt the basic sleeve block for different sleeve types.
Coming up next - how to adapt the basic sleeve block for different sleeve types.
Thank you for going to all this work! This is helpful.
ReplyDelete